> ## Documentation Index
> Fetch the complete documentation index at: https://docs.sync2books.com/llms.txt
> Use this file to discover all available pages before exploring further.
# Get Started with eTIMS
> This guide takes you from zero to a signed KRA receipt for your first sale.
This guide takes you from zero to a **signed KRA receipt** for your first sale.
The journey has two parts that mirror how the platform works:
* **Part 1 — Set up in the dashboard** (no code): create your app, get your API key, and **connect your company to eTIMS**. We handle the KRA/OSCU onboarding hoops for you here.
* **Part 2 — Operate via the API** (your code): register items, manage stock, and create sales.
> **The split in one line:** the **dashboard** connects a company to eTIMS once; your **code** does the day-to-day invoicing.
***
## Part 1 — Set up in the dashboard
Everything in the API is scoped to an **application**, and applications belong to an **organization**:
```
Organization ─┬─ Application ─┬─ Credential (Development: sk_development_…)
(your │ (your client │
company) │ / product) └─ Credential (Production: sk_production_…)
```
### Step 1.1 — Create your account
Go to the [Sync2Books Dashboard](https://sync2books.com/dashboard) and sign up. The form is a short two-step wizard: your personal details, then your organization (company name, industry, team size).
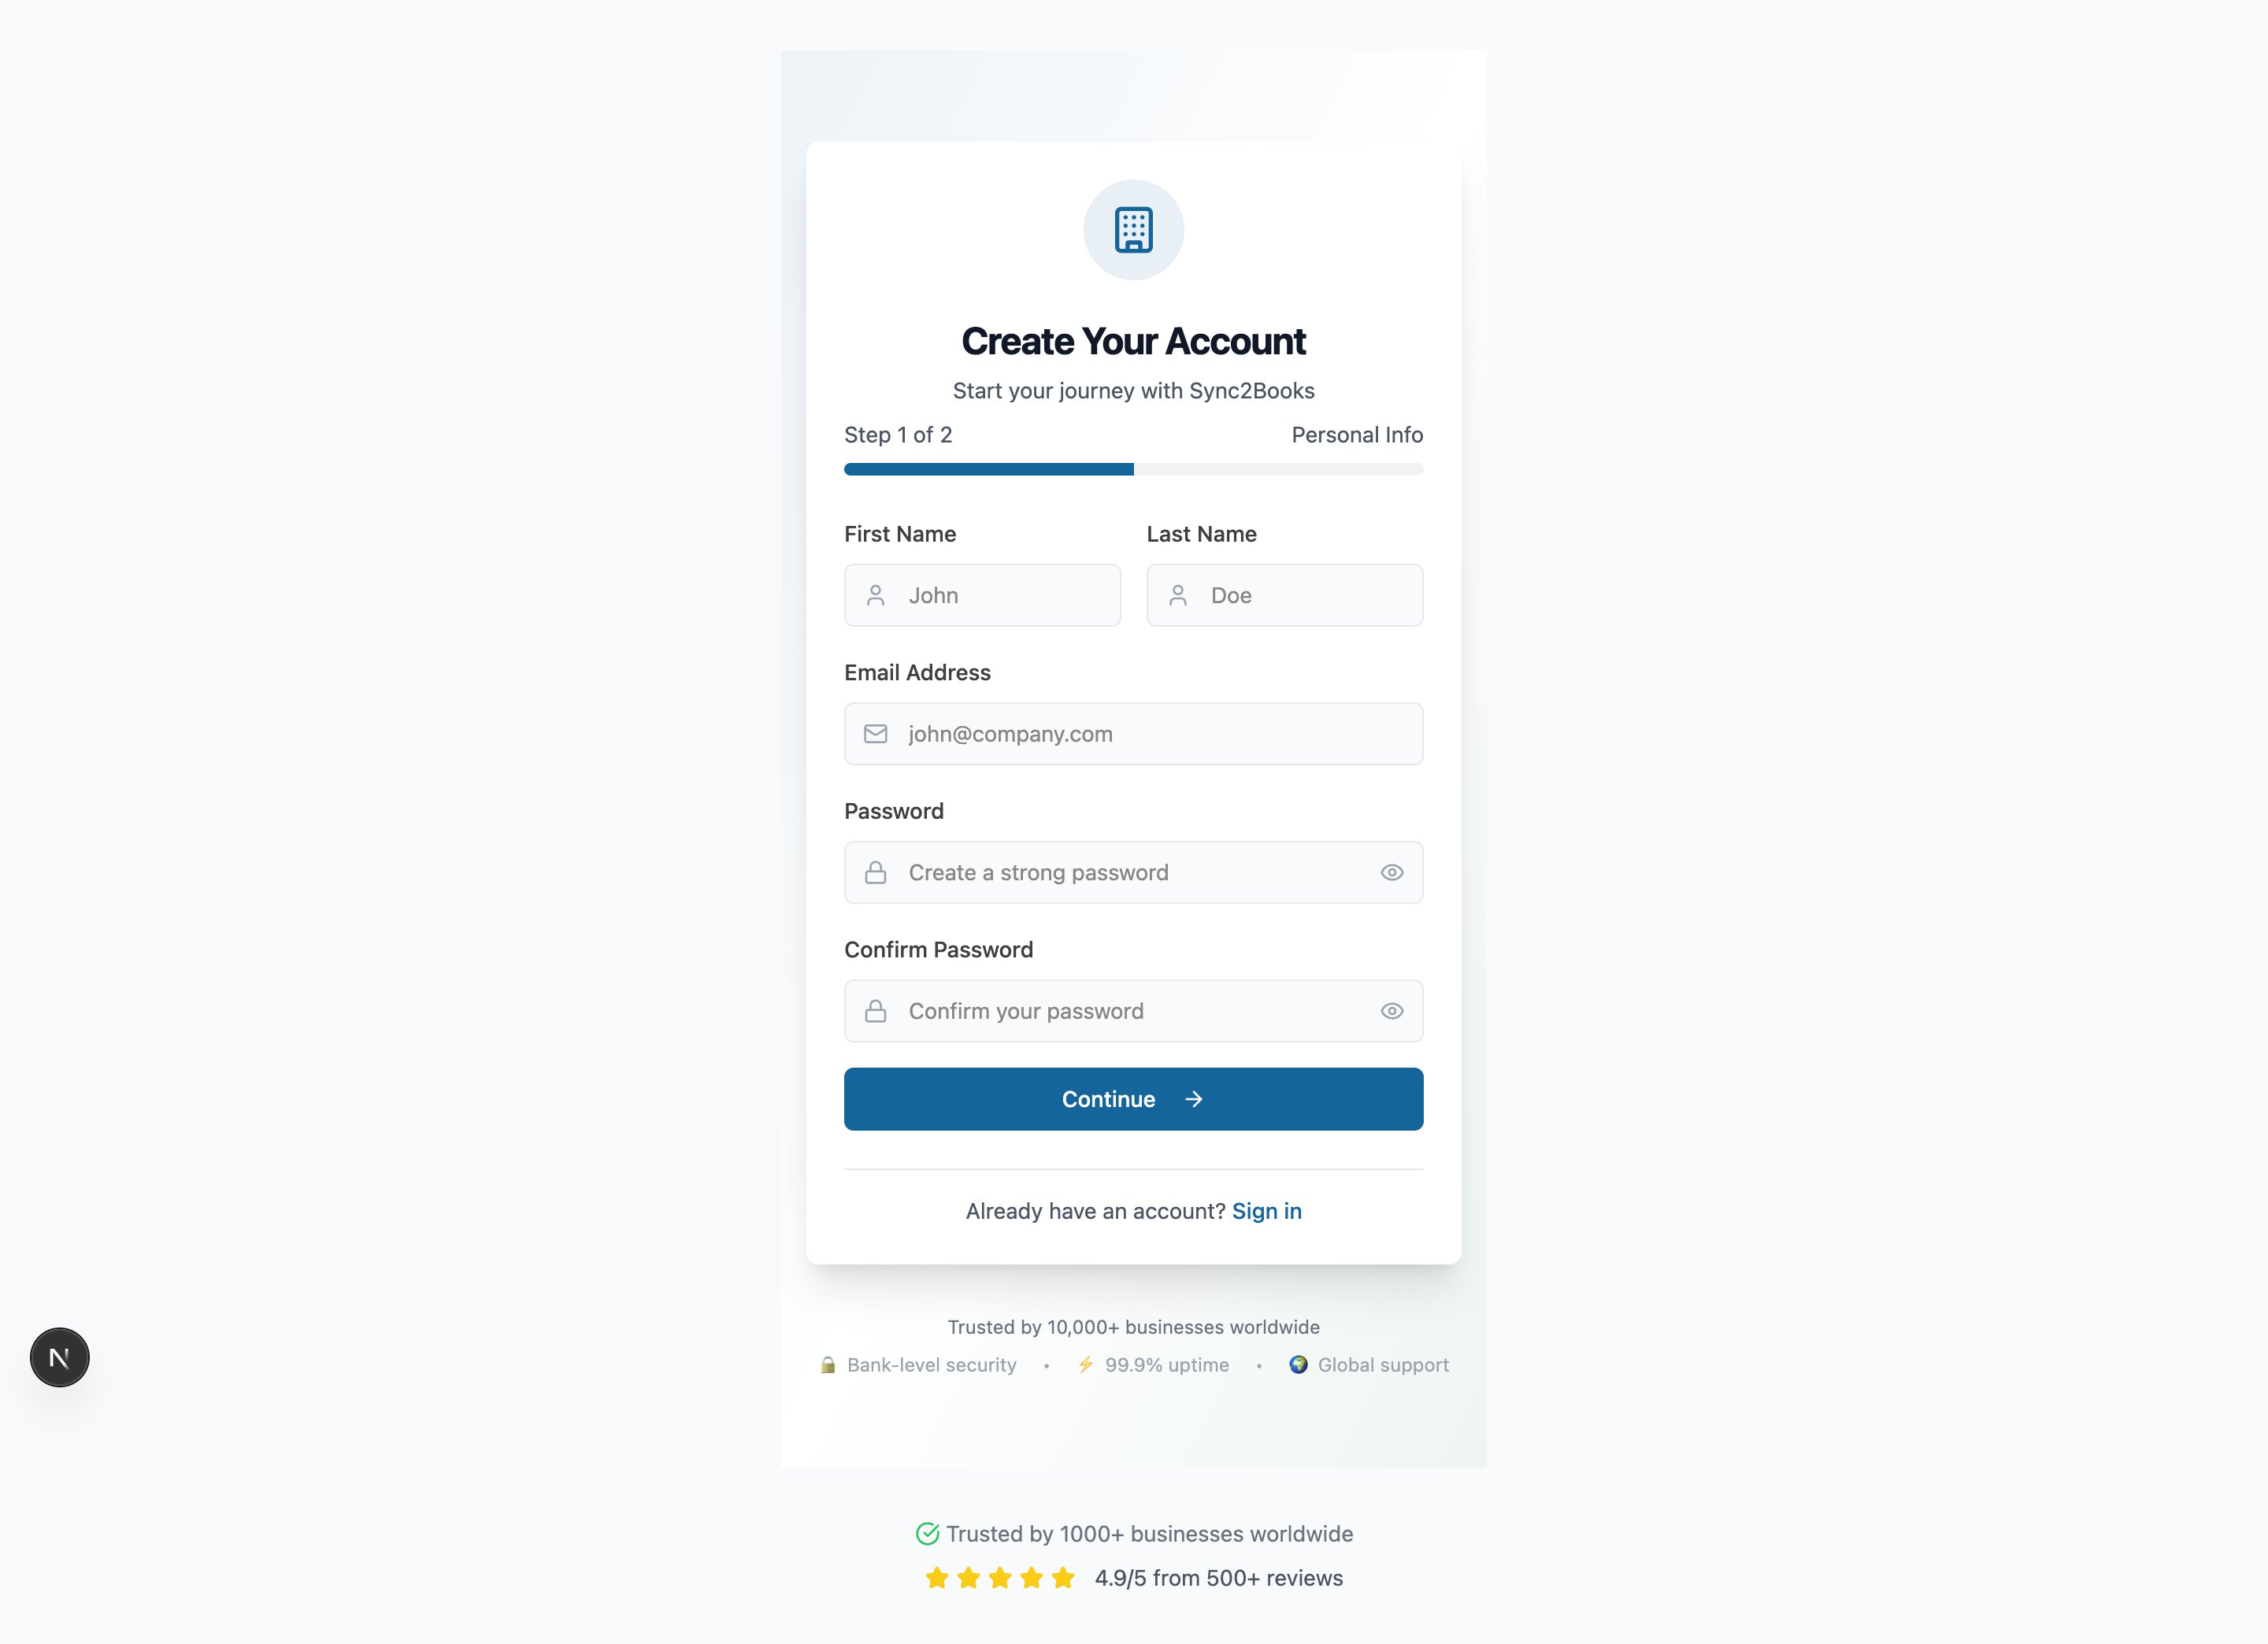 Submitting creates your **user**, your **organization**, and logs you in.
### Step 1.2 — Create an application
Onboarding walks you through creating your first **application** — your product/integration, which owns the API keys you'll use.
Submitting creates your **user**, your **organization**, and logs you in.
### Step 1.2 — Create an application
Onboarding walks you through creating your first **application** — your product/integration, which owns the API keys you'll use.
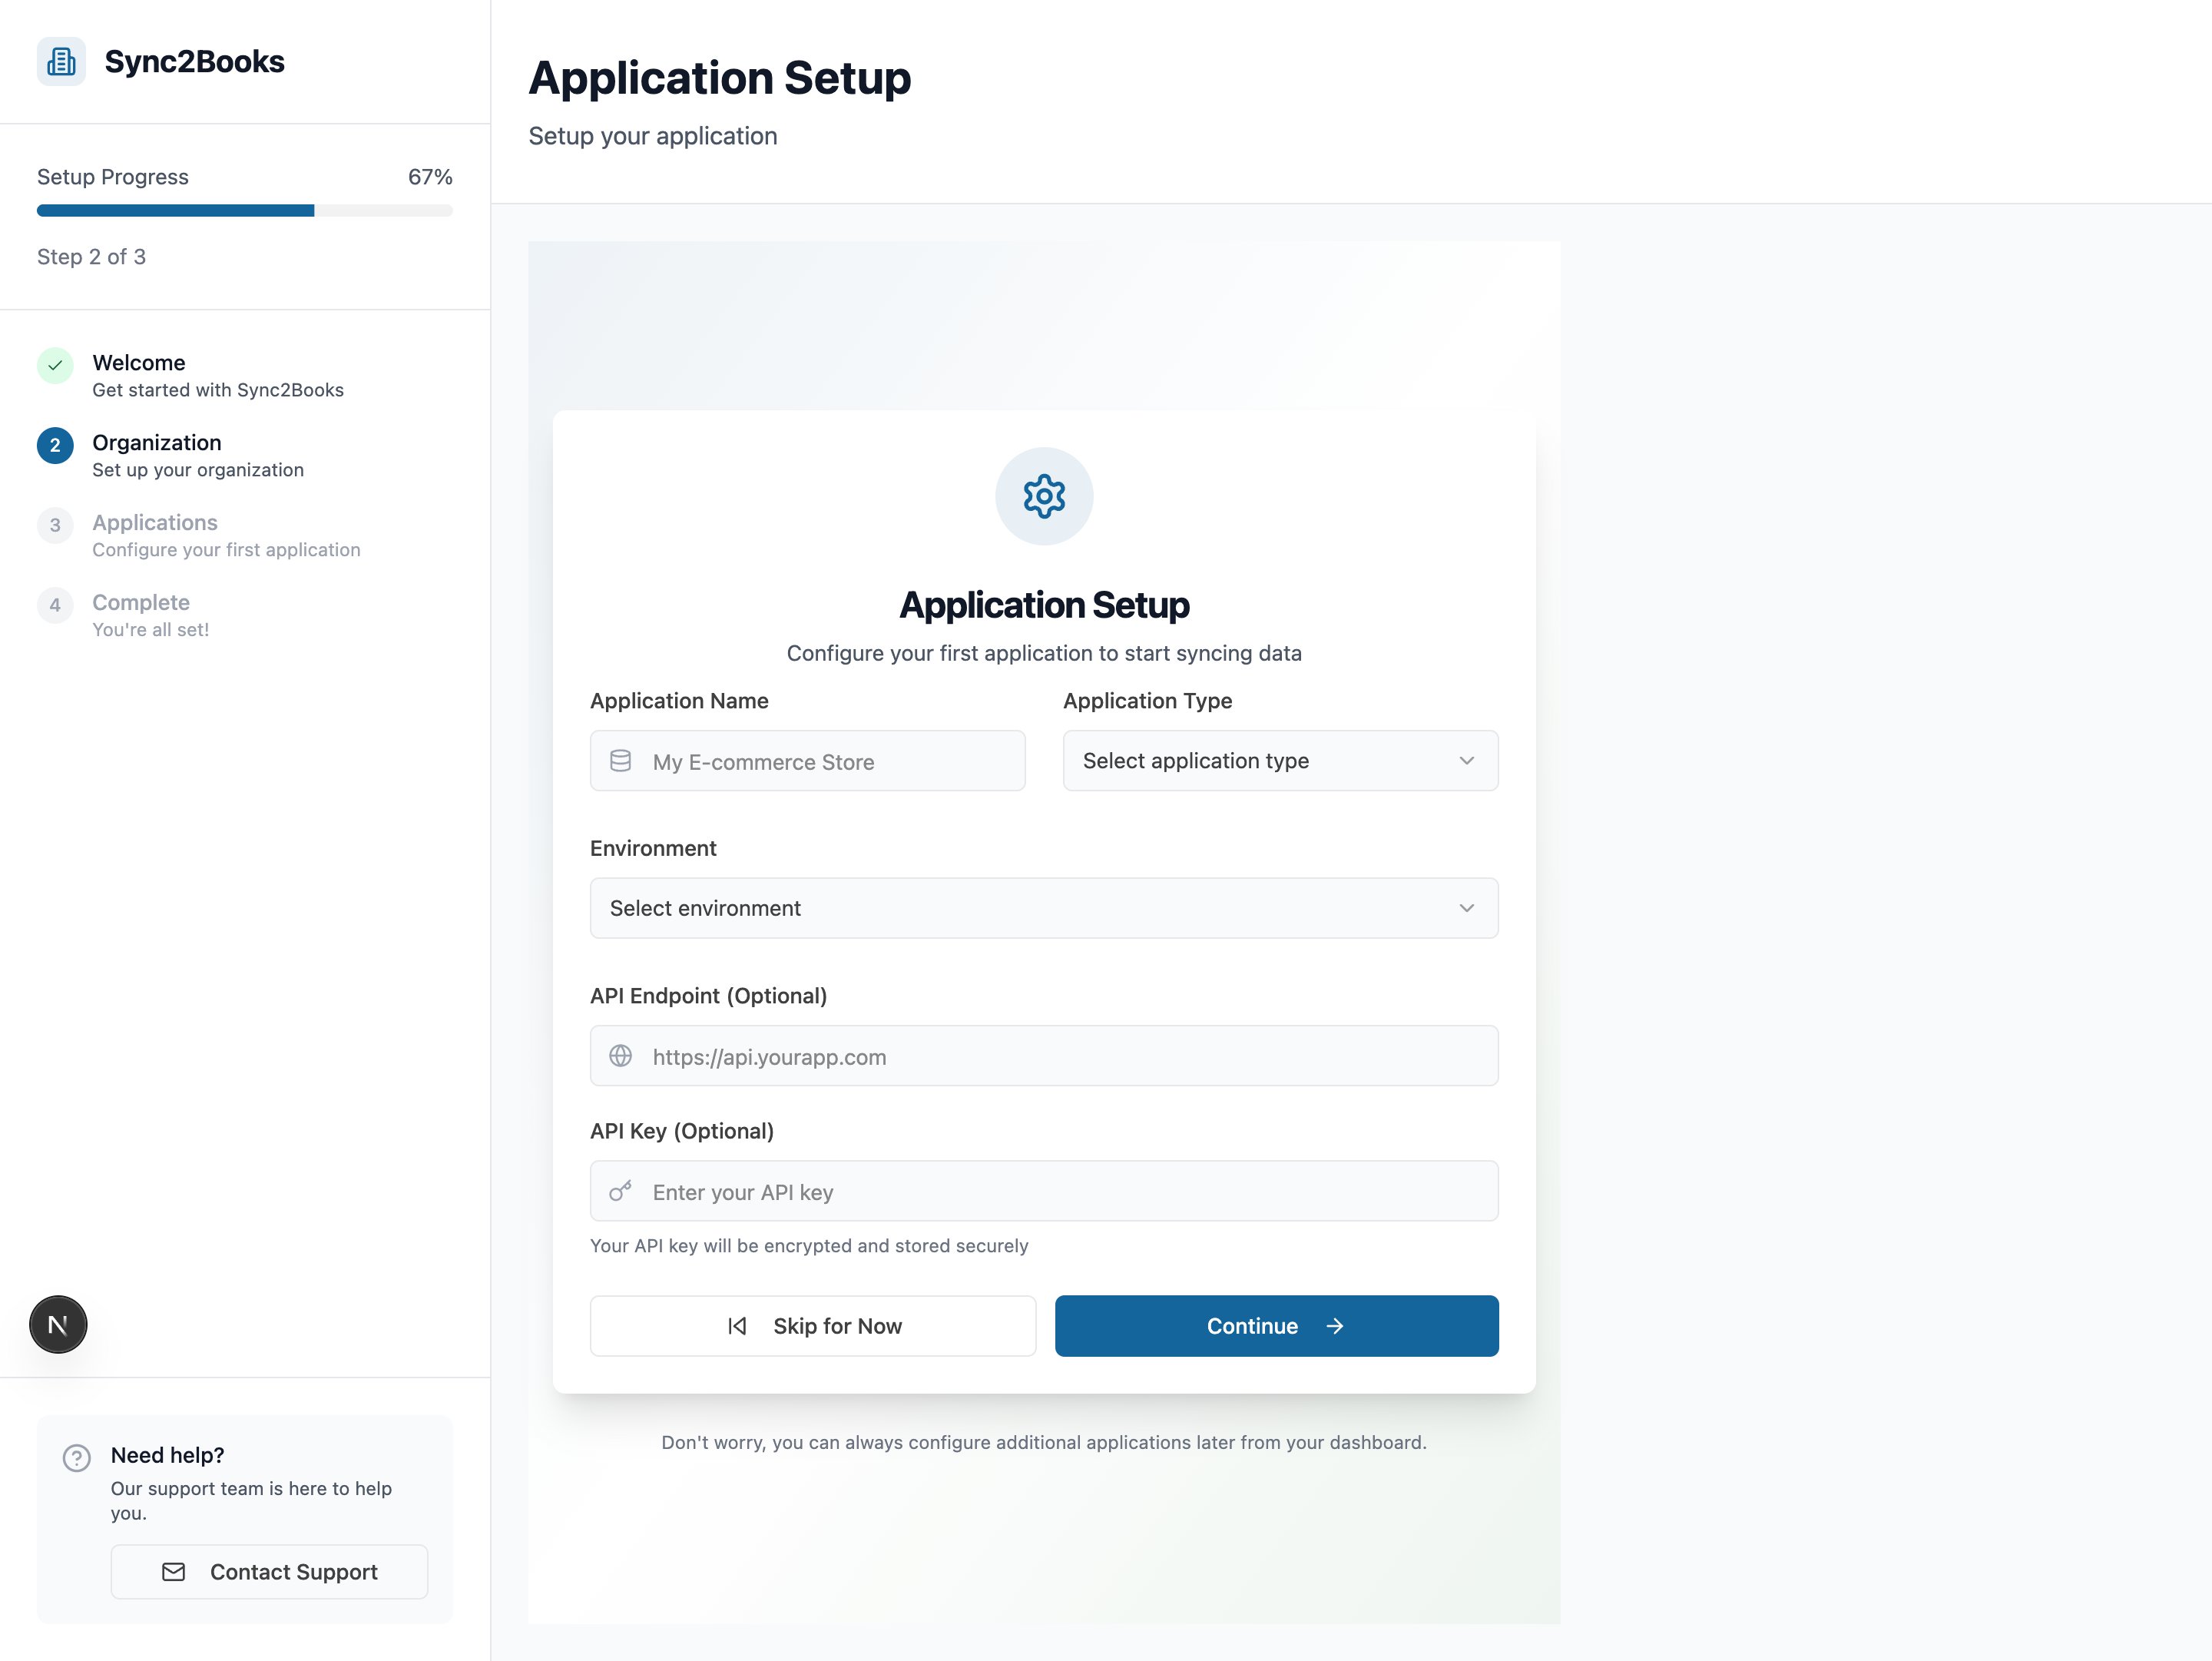 You can manage applications anytime from **Dashboard → Organization**.
 ### Step 1.3 — Copy your API key
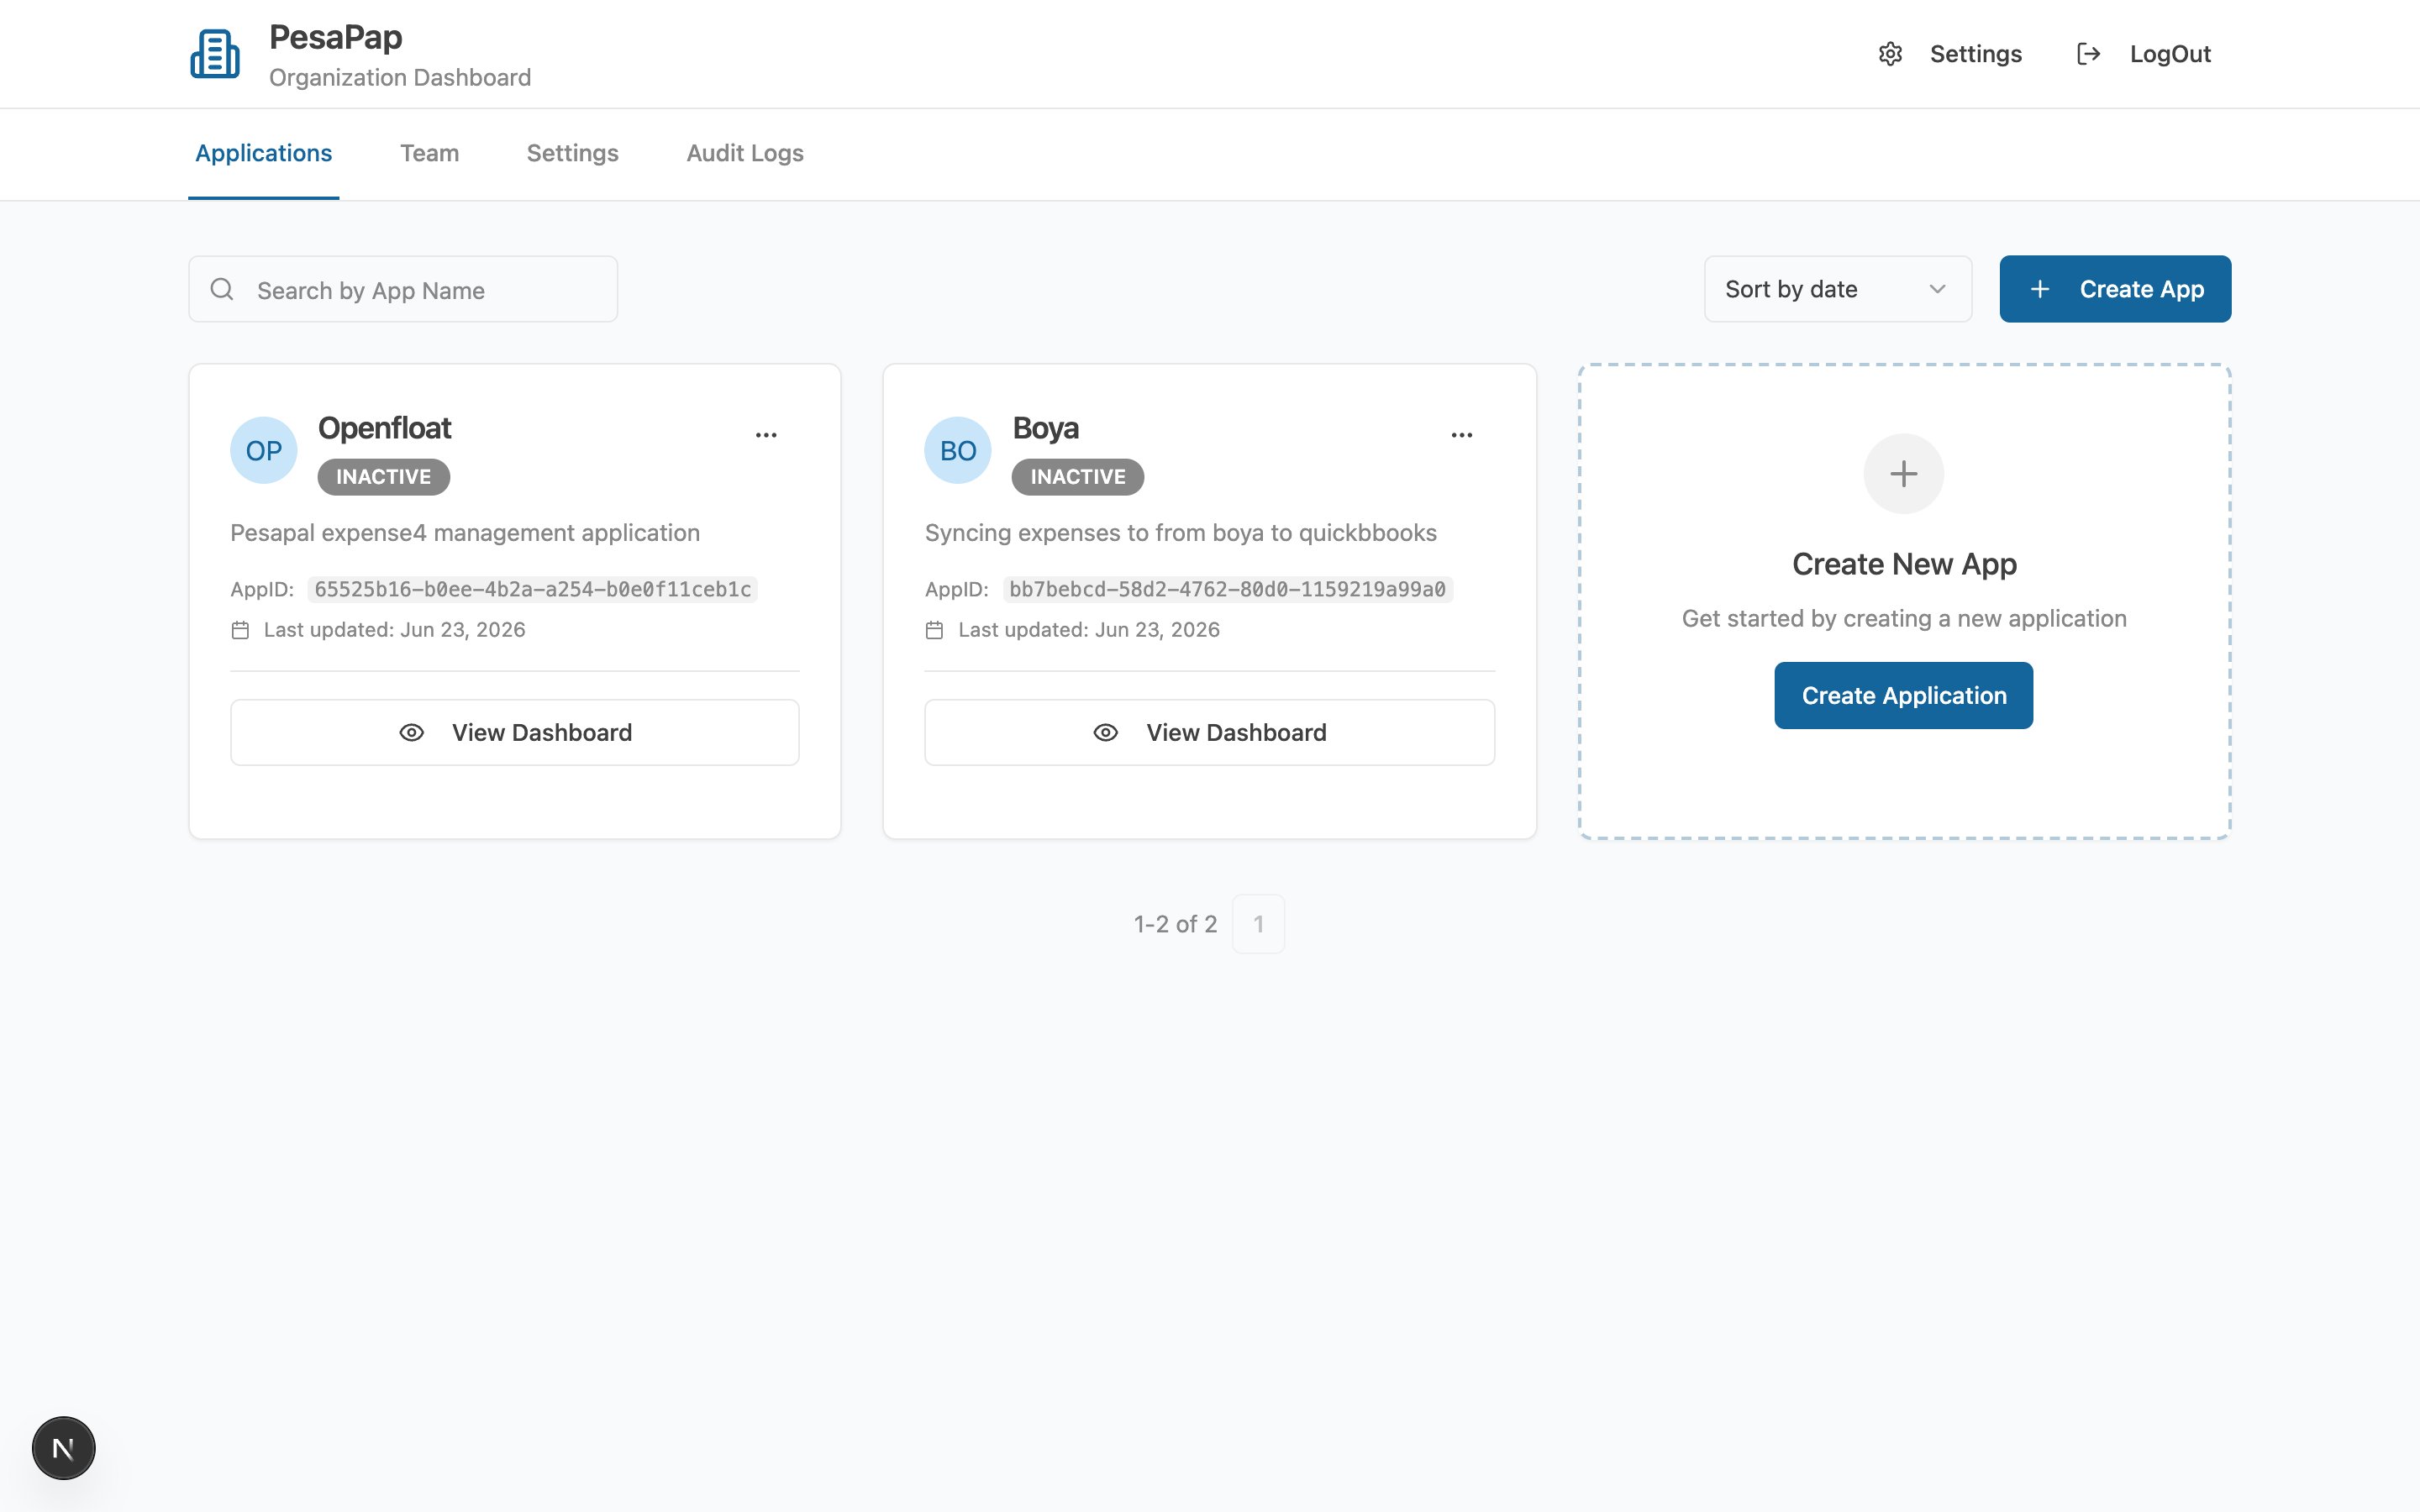
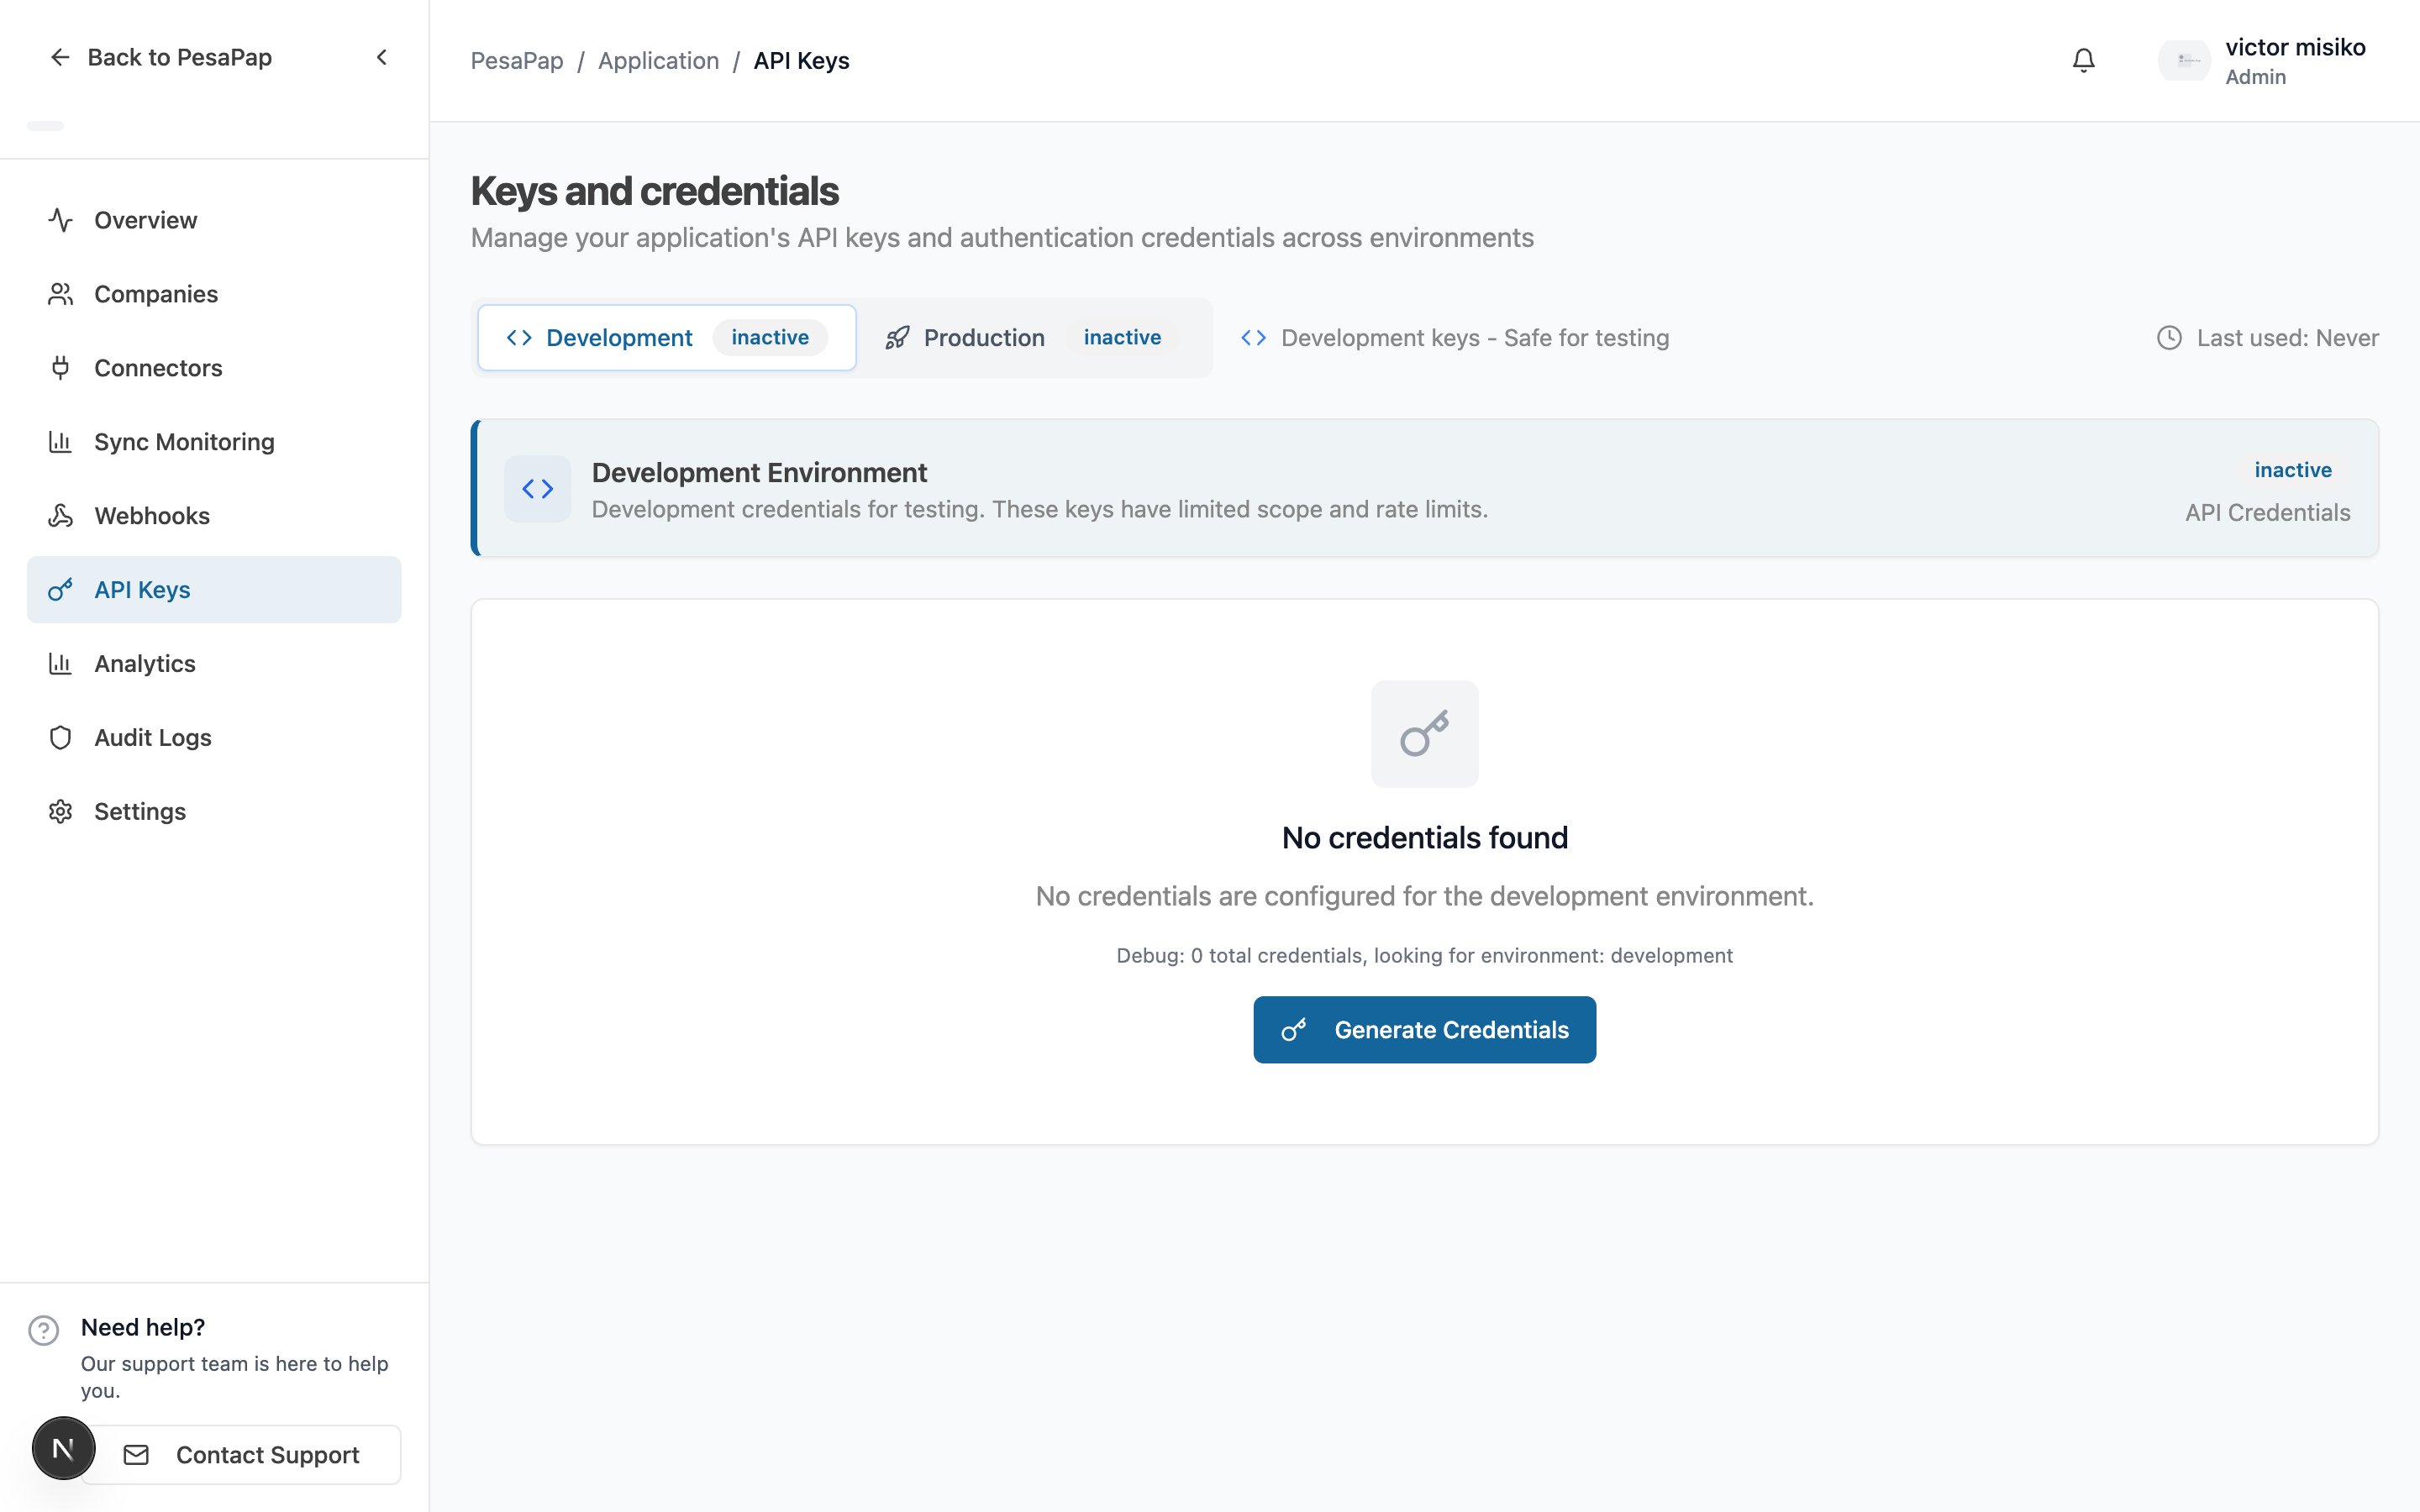
Open your application → **API Keys**. Toggle between **Development** and **Production**, then copy the **API Key** (`x-api-key`). Use **Development** while building.
### Step 1.3 — Copy your API key
Open your application → **API Keys**. Toggle between **Development** and **Production**, then copy the **API Key** (`x-api-key`). Use **Development** while building.
 Your key looks like:
```
sk_development_a1b2c3d4e5f6... # safe for testing
sk_production_z9y8x7w6v5u4... # live credentials
```
**Authentication is shared across all products.** Every API call sends this key in
the `X-API-Key` header; an HMAC signature (`X-Signature` + `X-Timestamp`) is optional.
The full mechanics — key formats, your client secret, and how to sign requests — live
once in [Core concepts → Authentication](/concepts/authentication).
### Step 1.4 — Add your company and connect it to eTIMS
This is the step that saves your customers from the KRA gauntlet. In the dashboard, add the business as a **company**, then open its **eTIMS** card and provision the connection: enter the KRA PIN, OSCU device serial, and branch details, and click **Provision**. Sync2Books runs the OSCU device initialization and activates the connection.
Your key looks like:
```
sk_development_a1b2c3d4e5f6... # safe for testing
sk_production_z9y8x7w6v5u4... # live credentials
```
**Authentication is shared across all products.** Every API call sends this key in
the `X-API-Key` header; an HMAC signature (`X-Signature` + `X-Timestamp`) is optional.
The full mechanics — key formats, your client secret, and how to sign requests — live
once in [Core concepts → Authentication](/concepts/authentication).
### Step 1.4 — Add your company and connect it to eTIMS
This is the step that saves your customers from the KRA gauntlet. In the dashboard, add the business as a **company**, then open its **eTIMS** card and provision the connection: enter the KRA PIN, OSCU device serial, and branch details, and click **Provision**. Sync2Books runs the OSCU device initialization and activates the connection.
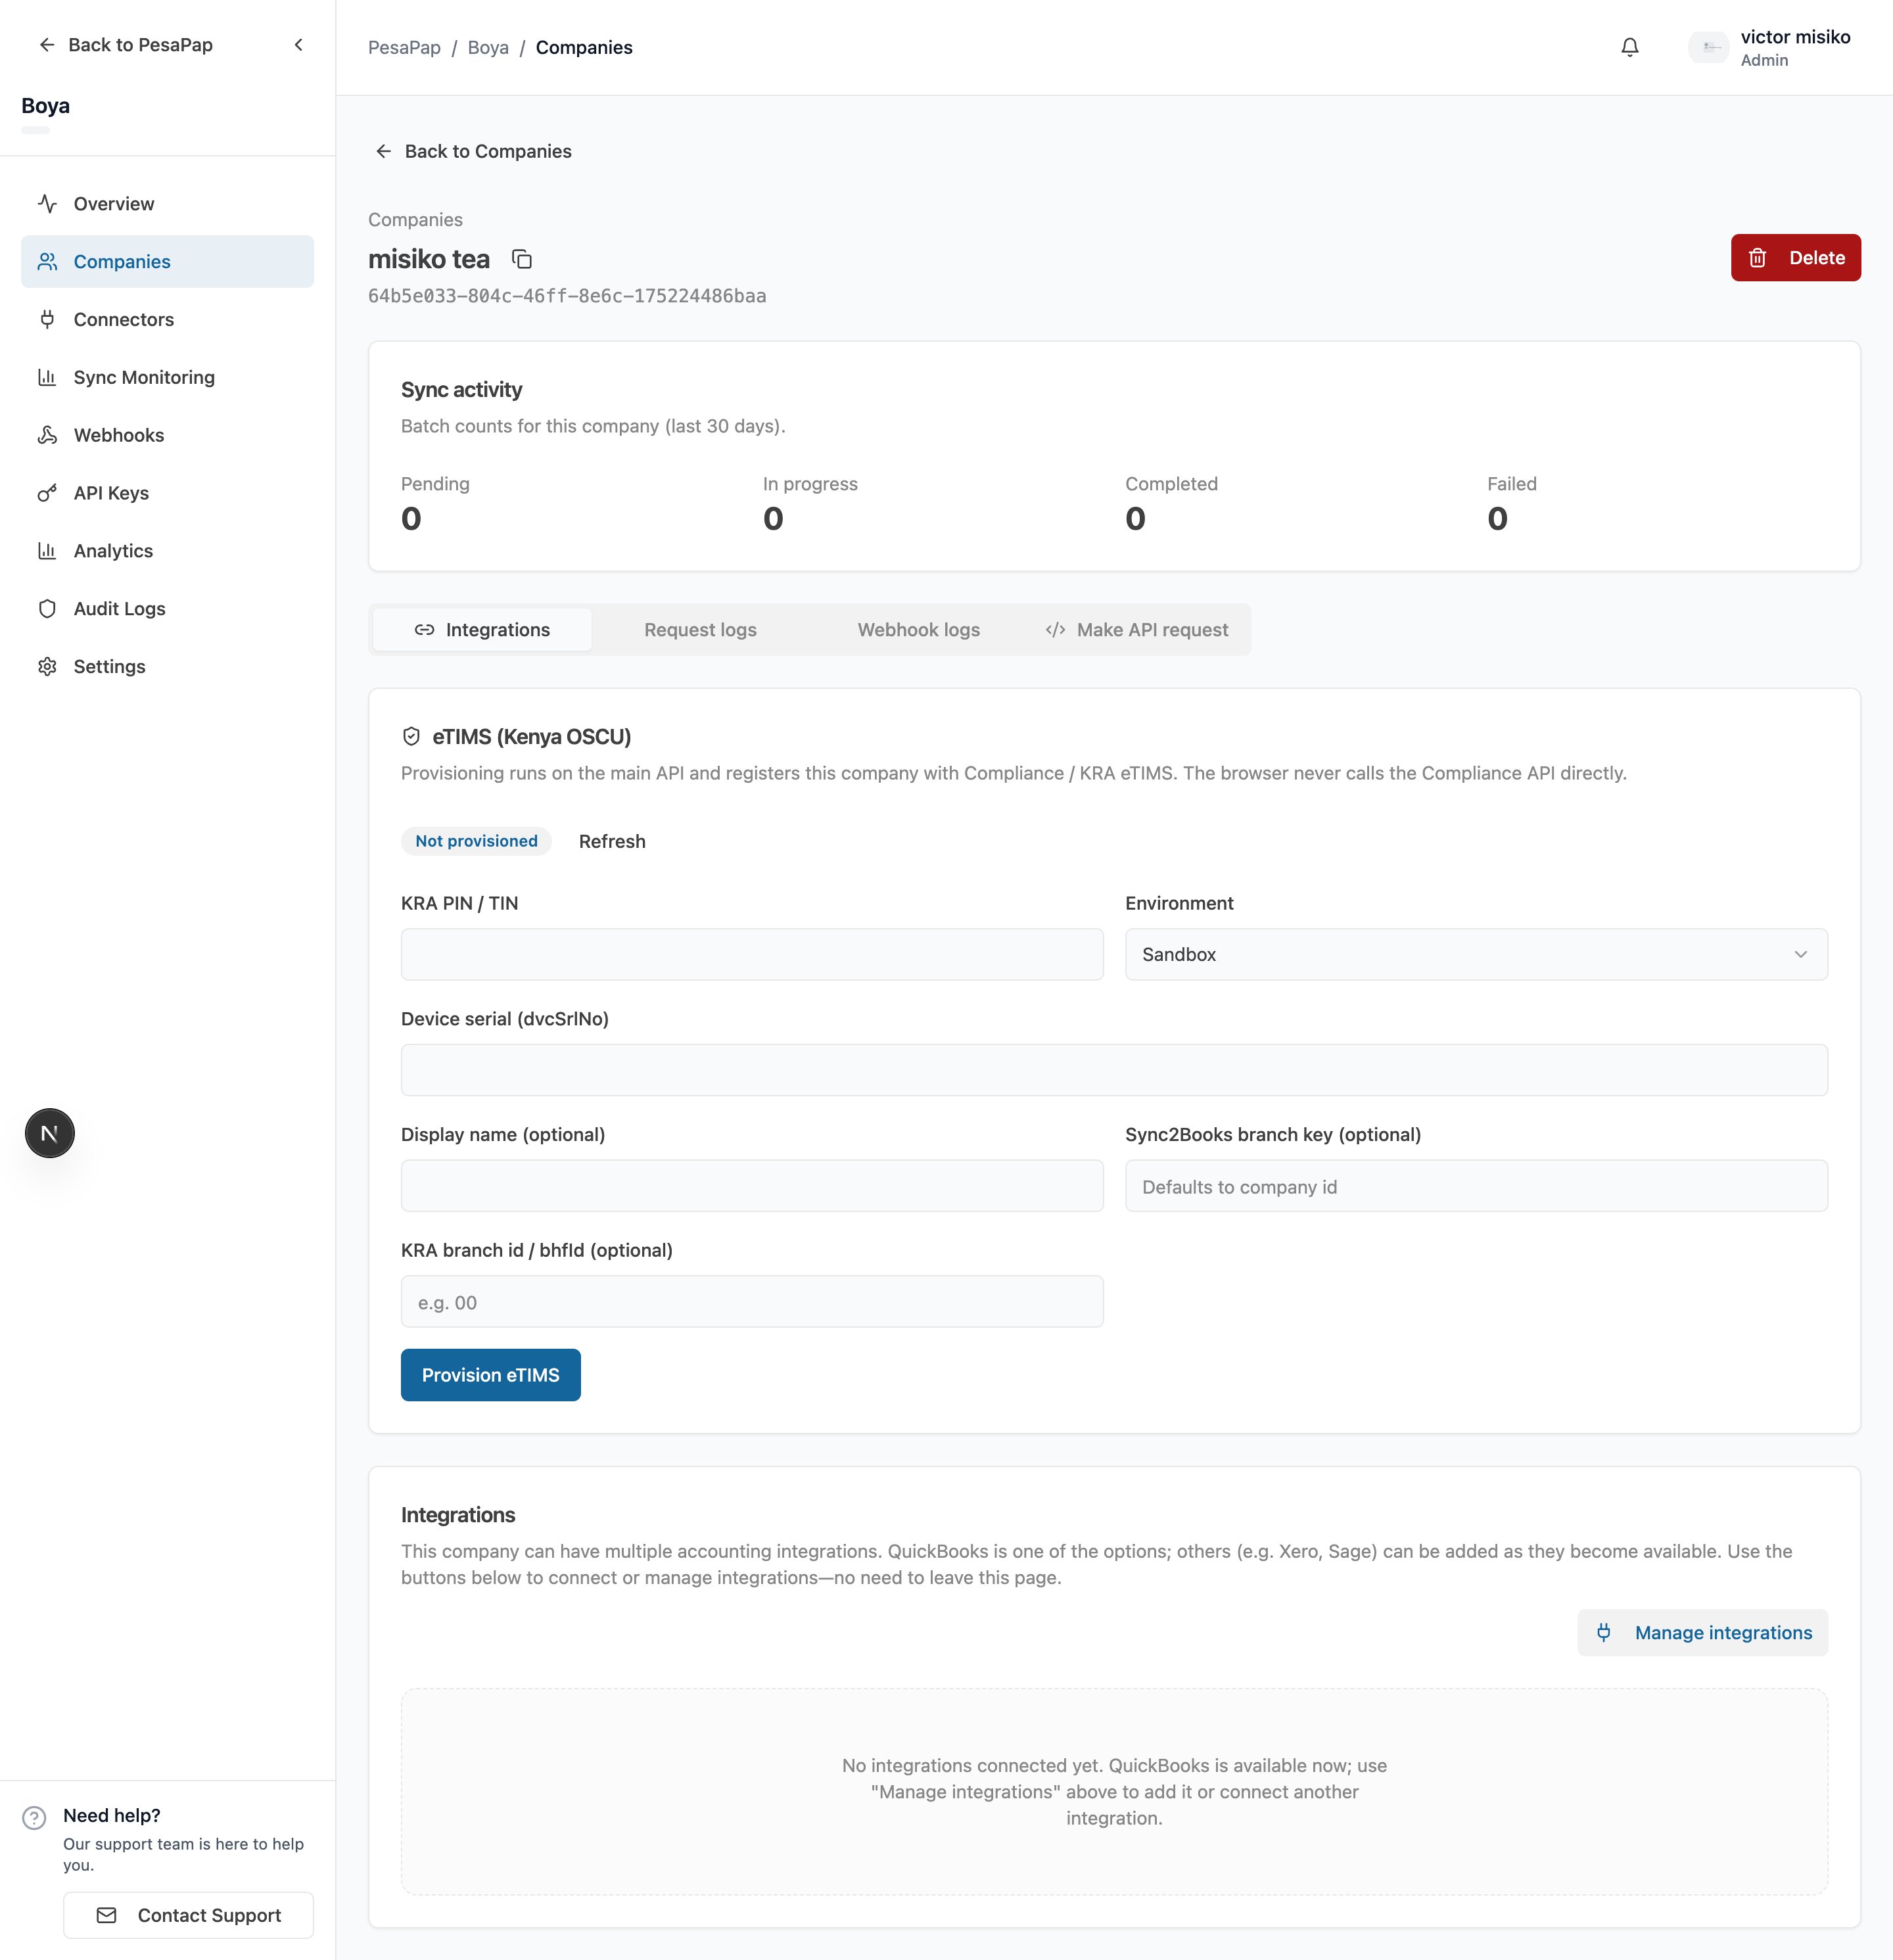 When it succeeds, the company shows as **Connected** and you have a **branch key** (e.g. `HQ`) that you'll use in API calls.
> Where do the KRA PIN, device serial, and branch ID come from? From the business's KRA OSCU onboarding — see **[the third-party integrator guide](/ETIMS_OSCU_INTEGRATION_AS_THIRD_PARTY)**. Sandbox values are fine while developing.
>
> Prefer to automate onboarding for many companies? There's an optional **provisioning API** too — see [Provisioning → Advanced](/etims-provisioning#advanced-provision-via-api).
You now have everything you need to call the API: an **API key** and a **connected company** (with its `companyId` and a `branchId`).
***
## Part 2 — Operate via the API
From here it's your code. Replace `{apiKey}`, `{companyId}` (from the dashboard), and `{branchId}` (e.g. `HQ`).
> **Want to try these instantly?** Import the [eTIMS Postman Collection](/etims-postman) — every request below is in it, with variables for your key and IDs.
> **The golden order matters.** eTIMS entities have prerequisites. Follow this sequence — skipping a step produces clear, but avoidable, errors:
>
> `register item → sync item → add stock → create sale → (credit note)`
>
> (The **add stock** step is for **goods** only — **services** are non-stock, so skip it. See [Goods vs Services](/etims-catalog#goods-vs-services-stock-vs-non-stock).)
### Step 2.1 — Register a catalog item
Register a product you want to sell. `externalId` is your own stable identifier (your SKU or accounting-system id).
```bash theme={null}
curl -X POST "https://api.sync2books.com/companies/{companyId}/integrations/etims/catalog/items" \
-H "X-API-Key: {apiKey}" \
-H "Content-Type: application/json" \
-d '{
"externalId": "sku-1001",
"name": "Maize Flour 2kg",
"itemType": "GOODS",
"taxCategory": "VAT_STANDARD",
"classificationCode": "14111400",
"unitCode": "U",
"packagingUnitCode": "NT"
}'
```
```json theme={null}
{ "syncBatchId": "9f0c…" }
```
> **`classificationCode` is effectively required** — without a valid KRA item classification code the register is rejected. See [Catalog](/etims-catalog#classification-codes).
You'll need the item's **`id`** next. Read it back from the catalog list (distinct from your `externalId`):
```bash theme={null}
curl -X GET "https://api.sync2books.com/companies/{companyId}/integrations/etims/catalog/items" \
-H "X-API-Key: {apiKey}"
```
### Step 2.2 — Sync the item to eTIMS
Registering stores the item; **syncing** registers it with KRA and assigns an eTIMS item code. An item **cannot be sold until it's synced**.
```bash theme={null}
curl -X POST "https://api.sync2books.com/companies/{companyId}/integrations/etims/catalog/items/sync" \
-H "X-API-Key: {apiKey}" \
-H "Content-Type: application/json" \
-d '{ "branchId": "{branchId}", "onlyPending": true }'
```
```json theme={null}
{ "syncBatchId": "a1b2…" }
```
After this completes, the item's `registrationStatus` becomes `REGISTERED`.
### Step 2.3 — Add stock (goods only)
Our example item is a **good** (`itemType: GOODS`), which is stock-tracked — a sale deducts inventory, so seed some stock first. Note this is a `PUT`.
> Selling a **service** (`itemType: SERVICE`)? Services are **non-stock** — skip this step and go straight to the sale. See [Goods vs Services](/etims-catalog#goods-vs-services-stock-vs-non-stock).
```bash theme={null}
curl -X PUT "https://api.sync2books.com/companies/{companyId}/integrations/etims/stock/adjust" \
-H "X-API-Key: {apiKey}" \
-H "Content-Type: application/json" \
-d '{ "itemId": "{itemId}", "branchId": "{branchId}", "quantity": 100, "action": "ADD" }'
```
```json theme={null}
{ "syncBatchId": "c3d4…" }
```
### Step 2.4 — Create a sale
Now invoice the item. The line item `id` is the item **`id`** from Step 2.1 (not your `externalId`).
```bash theme={null}
curl -X POST "https://api.sync2books.com/companies/{companyId}/integrations/etims/sales" \
-H "X-API-Key: {apiKey}" \
-H "Content-Type: application/json" \
-d '{
"branchId": "{branchId}",
"saleDate": "2026-06-20",
"traderInvoiceNumber": "INV-0001",
"receiptTypeCode": "S",
"paymentTypeCode": "01",
"invoiceStatusCode": "02",
"items": [
{
"id": "{itemId}",
"quantity": 2,
"unitPrice": 100,
"taxCategory": "VAT_STANDARD",
"taxAmount": 32,
"itemDescription": "Maize Flour 2kg"
}
]
}'
```
```json theme={null}
{ "syncBatchId": "e5f6…" }
```
This is **asynchronous**. Once KRA accepts the sale, it returns a signed **ETR receipt number**. Read it back:
```bash theme={null}
curl -X GET "https://api.sync2books.com/companies/{companyId}/integrations/etims/sales" \
-H "X-API-Key: {apiKey}"
```
The sale is then marked **accepted** and carries a KRA receipt number (`ETR-…`). See [Tracking Results](/etims-tracking-results) for how to know when it's done.
### Step 2.5 — (Optional) Issue a credit note
To reverse an accepted sale, raise an express credit note referencing the sale's `id` (`saleId`):
```bash theme={null}
curl -X POST "https://api.sync2books.com/companies/{companyId}/integrations/etims/sales/credit-notes/express" \
-H "X-API-Key: {apiKey}" \
-H "Content-Type: application/json" \
-d '{
"branchId": "{branchId}",
"saleId": "{saleDocumentId}",
"traderInvoiceNumber": "CN-0001",
"returnDate": "2026-06-20"
}'
```
***
## Recap
In the **dashboard** you:
1. Created an account, organization, and application, and copied your **API key**
2. Added a **company** and **connected it to eTIMS** (we handled OSCU onboarding)
Then via the **API** you:
3. **Registered** and **synced** a catalog item
4. **Added stock**
5. Created a **sale** and received an **ETR receipt**
6. (Optionally) issued a **credit note**
That's the full loop.
## Read next
* [Postman Collection](/etims-postman) — run every request in seconds
* [Provisioning](/etims-provisioning) — the dashboard flow (and optional API)
* [Catalog](/etims-catalog) — classification codes, the REGISTERED lifecycle
* [Sales & Credit Notes](/etims-sales) — document states, prerequisites, receipts
* [Stock](/etims-stock) — adjust and transfer
* [Tracking Results](/etims-tracking-results) — the async model
* [API Reference](/etims-api-reference) — every endpoint and field
When it succeeds, the company shows as **Connected** and you have a **branch key** (e.g. `HQ`) that you'll use in API calls.
> Where do the KRA PIN, device serial, and branch ID come from? From the business's KRA OSCU onboarding — see **[the third-party integrator guide](/ETIMS_OSCU_INTEGRATION_AS_THIRD_PARTY)**. Sandbox values are fine while developing.
>
> Prefer to automate onboarding for many companies? There's an optional **provisioning API** too — see [Provisioning → Advanced](/etims-provisioning#advanced-provision-via-api).
You now have everything you need to call the API: an **API key** and a **connected company** (with its `companyId` and a `branchId`).
***
## Part 2 — Operate via the API
From here it's your code. Replace `{apiKey}`, `{companyId}` (from the dashboard), and `{branchId}` (e.g. `HQ`).
> **Want to try these instantly?** Import the [eTIMS Postman Collection](/etims-postman) — every request below is in it, with variables for your key and IDs.
> **The golden order matters.** eTIMS entities have prerequisites. Follow this sequence — skipping a step produces clear, but avoidable, errors:
>
> `register item → sync item → add stock → create sale → (credit note)`
>
> (The **add stock** step is for **goods** only — **services** are non-stock, so skip it. See [Goods vs Services](/etims-catalog#goods-vs-services-stock-vs-non-stock).)
### Step 2.1 — Register a catalog item
Register a product you want to sell. `externalId` is your own stable identifier (your SKU or accounting-system id).
```bash theme={null}
curl -X POST "https://api.sync2books.com/companies/{companyId}/integrations/etims/catalog/items" \
-H "X-API-Key: {apiKey}" \
-H "Content-Type: application/json" \
-d '{
"externalId": "sku-1001",
"name": "Maize Flour 2kg",
"itemType": "GOODS",
"taxCategory": "VAT_STANDARD",
"classificationCode": "14111400",
"unitCode": "U",
"packagingUnitCode": "NT"
}'
```
```json theme={null}
{ "syncBatchId": "9f0c…" }
```
> **`classificationCode` is effectively required** — without a valid KRA item classification code the register is rejected. See [Catalog](/etims-catalog#classification-codes).
You'll need the item's **`id`** next. Read it back from the catalog list (distinct from your `externalId`):
```bash theme={null}
curl -X GET "https://api.sync2books.com/companies/{companyId}/integrations/etims/catalog/items" \
-H "X-API-Key: {apiKey}"
```
### Step 2.2 — Sync the item to eTIMS
Registering stores the item; **syncing** registers it with KRA and assigns an eTIMS item code. An item **cannot be sold until it's synced**.
```bash theme={null}
curl -X POST "https://api.sync2books.com/companies/{companyId}/integrations/etims/catalog/items/sync" \
-H "X-API-Key: {apiKey}" \
-H "Content-Type: application/json" \
-d '{ "branchId": "{branchId}", "onlyPending": true }'
```
```json theme={null}
{ "syncBatchId": "a1b2…" }
```
After this completes, the item's `registrationStatus` becomes `REGISTERED`.
### Step 2.3 — Add stock (goods only)
Our example item is a **good** (`itemType: GOODS`), which is stock-tracked — a sale deducts inventory, so seed some stock first. Note this is a `PUT`.
> Selling a **service** (`itemType: SERVICE`)? Services are **non-stock** — skip this step and go straight to the sale. See [Goods vs Services](/etims-catalog#goods-vs-services-stock-vs-non-stock).
```bash theme={null}
curl -X PUT "https://api.sync2books.com/companies/{companyId}/integrations/etims/stock/adjust" \
-H "X-API-Key: {apiKey}" \
-H "Content-Type: application/json" \
-d '{ "itemId": "{itemId}", "branchId": "{branchId}", "quantity": 100, "action": "ADD" }'
```
```json theme={null}
{ "syncBatchId": "c3d4…" }
```
### Step 2.4 — Create a sale
Now invoice the item. The line item `id` is the item **`id`** from Step 2.1 (not your `externalId`).
```bash theme={null}
curl -X POST "https://api.sync2books.com/companies/{companyId}/integrations/etims/sales" \
-H "X-API-Key: {apiKey}" \
-H "Content-Type: application/json" \
-d '{
"branchId": "{branchId}",
"saleDate": "2026-06-20",
"traderInvoiceNumber": "INV-0001",
"receiptTypeCode": "S",
"paymentTypeCode": "01",
"invoiceStatusCode": "02",
"items": [
{
"id": "{itemId}",
"quantity": 2,
"unitPrice": 100,
"taxCategory": "VAT_STANDARD",
"taxAmount": 32,
"itemDescription": "Maize Flour 2kg"
}
]
}'
```
```json theme={null}
{ "syncBatchId": "e5f6…" }
```
This is **asynchronous**. Once KRA accepts the sale, it returns a signed **ETR receipt number**. Read it back:
```bash theme={null}
curl -X GET "https://api.sync2books.com/companies/{companyId}/integrations/etims/sales" \
-H "X-API-Key: {apiKey}"
```
The sale is then marked **accepted** and carries a KRA receipt number (`ETR-…`). See [Tracking Results](/etims-tracking-results) for how to know when it's done.
### Step 2.5 — (Optional) Issue a credit note
To reverse an accepted sale, raise an express credit note referencing the sale's `id` (`saleId`):
```bash theme={null}
curl -X POST "https://api.sync2books.com/companies/{companyId}/integrations/etims/sales/credit-notes/express" \
-H "X-API-Key: {apiKey}" \
-H "Content-Type: application/json" \
-d '{
"branchId": "{branchId}",
"saleId": "{saleDocumentId}",
"traderInvoiceNumber": "CN-0001",
"returnDate": "2026-06-20"
}'
```
***
## Recap
In the **dashboard** you:
1. Created an account, organization, and application, and copied your **API key**
2. Added a **company** and **connected it to eTIMS** (we handled OSCU onboarding)
Then via the **API** you:
3. **Registered** and **synced** a catalog item
4. **Added stock**
5. Created a **sale** and received an **ETR receipt**
6. (Optionally) issued a **credit note**
That's the full loop.
## Read next
* [Postman Collection](/etims-postman) — run every request in seconds
* [Provisioning](/etims-provisioning) — the dashboard flow (and optional API)
* [Catalog](/etims-catalog) — classification codes, the REGISTERED lifecycle
* [Sales & Credit Notes](/etims-sales) — document states, prerequisites, receipts
* [Stock](/etims-stock) — adjust and transfer
* [Tracking Results](/etims-tracking-results) — the async model
* [API Reference](/etims-api-reference) — every endpoint and field